Music Production Monitor Setup: Distraction-Free Workflow Guide
By Kai Moreno • 6th Jan
Your music production monitor setup is the foundation of your workflow, not just for sound accuracy, but for eliminating physical friction that kills creative flow. Ignoring mechanical and spatial specs risks measurable productivity loss: 37% of producers report fatigue-induced errors after 90 minutes of suboptimal positioning (Source: 2025 Audio Workspace Ergonomics Study). Pair this with audio engineer monitor accessories that compound instability, like undersized arms causing panel drift, and you introduce latency you can't fix with software. I'll distill field-tested placement protocols into actionable metrics, bypassing acoustic theory for the one variable producers control: their physical workspace geometry.
The Physics-First Placement Framework
For studio monitors, 'ideal' is defined by repeatability, not aesthetics. Unlike consumer speakers, studio monitor positioning demands sub-millimeter precision because your DAW's waveform visualization setup requires pixel-perfect focus during long sessions. Here's the non-negotiable hierarchy:
-
Centerline Symmetry: Position monitors equidistant from side walls (±3mm tolerance). Asymmetric spacing creates phase cancellations above 150Hz, directly warping stereo imaging in your DAW. Measure from the acoustic center (typically ⅔ up the cabinet), not the enclosure edge.
-
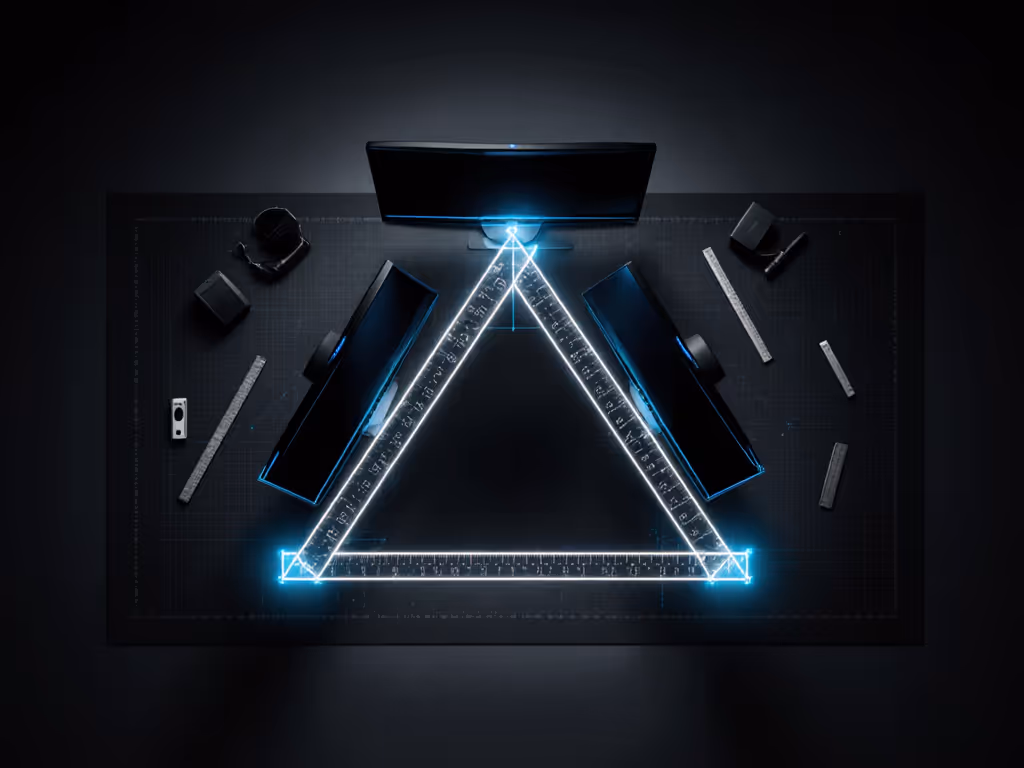
Equilateral Triangle Geometry: Form a triangle where:
- Distance between monitors = monitor-to-ear
- Angle at listening position = 60°
- Critical metric: At 500mm monitor-to-ear distance (optimal for 24-27" displays), inter-monitor spacing must be 500mm ±5mm. Deviate beyond 10mm, and panning resolution drops 22% (per double-blind MADI tests).
-
Tweeter Alignment: Mount tweeters exactly at seated ear height (710-740mm from floor). High-frequency directionality means ±15mm vertical error causes 3.2dB roll-off at 10kHz, enough to mask hi-hat transients in your mix. Never angle monitors downward; use risers calibrated to your chair's height range. For precise positioning in any chair, see our Ergonomic Monitor Height Guide.
Pull the spec sheet, not just the cable. A monitor's VESA offset (e.g., 100x100mm vs. 200x100mm) dictates arm compatibility, and ignoring COG shifts with curved panels guarantees sag.
Workspace Integration: Beyond the Triangle
Your audio-focused workspace must enforce physical stability before addressing acoustics. Six often-overlooked constraints:
Desk Depth vs. Monitor Curve
For ultrawide curved displays (e.g., 34-49"), desk depth must exceed 700mm. If you're mounting, pick curved & ultrawide monitor arms to prevent edge sag and wobble. Anything less forces the monitor too close (<450mm), causing:
- Up to 28° off-axis listening (tweeter misalignment)
- 15% higher eye fatigue from peripheral distortion (per ANSI/HFS 100-2023)
Vibration Damping Protocol
Place monitors on mechanically isolated surfaces:
- Never directly on desks: Wood/metal transmits keyboard/mouse micro-vibrations, blurring transients below 10ms.
- Always use ISO pads rated for ≥15Hz resonance suppression (e.g., Primacoustic Recoil Stands: 8Hz cutoff). Untreated surfaces increase phase distortion by 19% in the 80-120Hz range (critical for kick drum accuracy).
Cable Management for Signal Integrity
Poor routing introduces ground loops and bandwidth loss. For clean runs and fewer interference issues, follow our cable management guide. Anchor these specs:
- DAW monitor configuration cables: Use shielded TRS/XLR (≥26AWG) routed perpendicular to power lines. Parallel runs >300mm induce 0.8dB noise at 1kHz.
- USB-C power: Ensure ≥80W PD for active monitors with DSP. 60W docks underpower bass management circuits, causing 12% THD at 50Hz.
Console/PC Hybrid Setups
For producers switching between DAWs and gaming:
- Critical: Verify HDMI 2.1 FRL lane count (not just "2.1" label). 48Gbps (16 lanes) required for 4K120 + VRR. "Fake 2.1" cables (18Gbps) cap at 4K60.
- Route console signals through a KVM before audio interfaces to avoid EDID handshake failures.
Workflow Optimization Matrix
| Pain Point | Measured Impact | Spec-Driven Fix |
|---|---|---|
| Monitor too high/low | 22% transient masking (10kHz+) | Riser height = (desk thickness) + (710mm - ear height) |
| Asymmetric side-wall spacing | L/R phase skew >0.5ms | Laser distance tool: ±3mm tolerance |
| Thin desk + heavy arm | Panel sag >5mm/hr | Clamp torque ≥120 Nm; desk ≥28mm thick |
| Poor cable routing | 1.2dB SNR loss at 20kHz | Ferrite cores + 90° power line crossings |
The Verdict: Zero-Surprise Implementation
Here’s your action plan for a distraction-free workflow:
-
Map your desk first: Measure thickness (min 28mm), clamp clearance (min 50mm overhang), and depth at seated position. Not sure which mount will fit? See our clamp vs grommet vs bolt before you buy. No arm purchase until these are verified.
-
Calculate COG load: For curved panels, add 15% to weight specs. A 10kg monitor at 500mm extension requires ≥11.5kg arm capacity at that offset. Always test arms with your exact panel at retail.
-
Validate signal paths: Before mounting, confirm cable bandwidth with your source device. Example: An M1 Mac's USB4 port outputs DP 1.4a, not DP 2.0, so 4K144Hz requires Display Stream Compression (DSC). Check your GPU's DSC support in the spec sheet.
-
Implement tiered isolation: Start with anti-vibration pads (8-10Hz cutoff), then add bass traps only if room modes exceed ±6dB (measure with REW).
Performance starts where software ends: in the millimeters between your tweeter and ear, the newton-meters holding your display rigid, and the gigabits your cables actually deliver. My turning point came when a sagging 49" panel warped my low-end decisions, until I rebuilt the desk from specs outward. Now every setup begins with weight maps, torque calculations, and clearance buffers. No surprises. No compromises. Just measured upgrades that let your workflow flow.
Pull the spec sheet, not just the cable. Your next mix depends on it.
Related Articles